AuthorThe previous article focused on leads against NT contracts. When you are defending against a suit contract, you have many more strategies to choose from. Here is a list of the possible plans, from the opening leader, against a suit contract:
Note that this theme is often introduced as a dilemma between active and passive leads, which is a rather poor way of describing the gamut of possibilities. Whereas the strategy against NT contracts is remarkably constant -- to establish the partnership's best suit (be it your own or your partner's), against a suit contract there are many more choices. How should we proceed? There is no easy formula that will always give you the best result. Nevertheless, applying some method to your reasoning will help you to weed out the worst strategies in any given case. The main tool here is the visualization of the opposing hands. This has two dimensions: distribution and high-card power. Before leading, ask yourself these questions:
Having answered these questions, you will be in a much better position to choose your opening salvo. For example -- when the opponents sacrifice over a slam (i.e., you have bid a slam hoping to make it, and they have bid a higher contract, fully expecting to go down, but hoping that the penalty will be worth their trouble), it is absolutely normal and commonplace to lead trumps. Why? Because (1) they don't have many honors, (2), they have plenty of trumps, (3), they should not have many tricks in which to pitch their losers (after all, you bid a slam to make!), and therefore (4) their main hope of extra tricks is by ruffing, so your best strategy is to curtail their ruffing power. Makes sense, doesn't it? You are already aching for some cards, I can feel it. Let us look at more concrete examples.
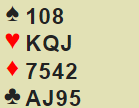
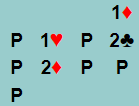
How many high-card points does your partner have? At least some 7/8. If he had lass, your opponents would be bidding higher. How many trumps do the opponents have? Not many. Dummy merely preferred diamonds to clubs. They could even have only 7 trumps. A 5-2 division is not uncommon in this auction. There is one important clue -- he has at least as many diamonds as clubs, probably more diamonds than clubs. If you put all the clues together and visualize how declarer will probably approach the hand (imagine him having, for example, 3 diamonds and 1 club in dummy), you will eschew the enticing heart lead and pick a trump. This lead is absolutely correct in the given auction. Any heart tricks that you may win will not disappear if you start with a trump. The next situation is completely different. 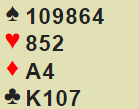 Imagine you picked these cards and listened to this auction:  You are West. The spade lead is safe (= passive), but if you intend to defeat the contract, it is certainly odds against. How do you suppose the play will proceed? Declarer will draw trumps (losing a trick to your Ace), and then discard losers in dummy's hearts (perhaps establishing the suit with ruffs, perhaps they are already established -- your three small in this suit are bad news). In a slam contract, there is no time for passivity. You must establish one trick as quickly as possible, to go along with your trump trick. Your best chance (the lead that requires the less help from partner) is to lead a club. It looks unpleasant, but it is surely indicated. Any club losers that declarer may have will be discarded in hearts if you don't try to establish them before you win your trump trick. Let us look at an example of a passive lead (and how to diagnose it): 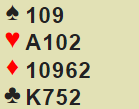 You are West and the bidding was: 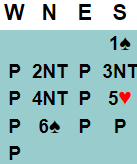 How much high-card strength does your partner have? Not much! We have an Ace and a King, how much more can he have? How are the opposing hands? Apparently, balanced. Is there any long suit in which losers can be discarded? There is no evidence of it. All signs point at a passive lead. I am not a big fan of trump leads as passive strategy, but in this case, and especially if they play keycard, i.e., they have shown AK of trumps -- remember, you have one Ace -- the lead of the 10 of spades looks good. Try to find the killing lead in the next hand.  You are West (aren't you always?) and the bidding was: 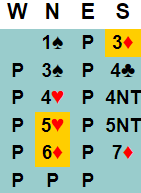 3 Diamonds was strong, natural. The reply to the 4NT/5NT asks showed 2 Aces and 1 King. How are the opposing hands? North has long and rebiddable spades. South has solid diamonds (North never suggested support). South showed a club control, North showed a heart control. One clear possibility for trick-producing (from declarer's viewpoint) is to establish dummy's spades. And you know they will break (even if declarer has only a singleton, i.e., if they are divided 6-1). The best way to interrupt this basic plan (draw trumps, establish spades with a ruff, go over to dummy and cash spades) is to take away dummy's side entry. If dummy has only one side entry and you take it away with the opening lead, you prevent declarer from going over to dummy at the end of his plan. And the dummy apparently has the Ace of hearts. There's your roadmap. Lead a heart (rather than the safe club). In any tough bridge book you would be required to lead the heart King, making sure to drive out dummy's Ace, but we're more lenient here. Any heart lead defeats the hand: 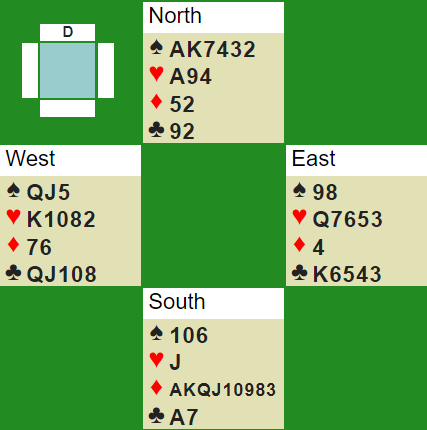 Our last exhibit took place in the finals of a NABC. You have the following cards (being East, for a change):  And the bidding was: 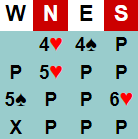 So, what do you lead, and why? I have no doubt that my competent opponents have not bid 6 Hearts, vulnerable against not, as a sacrifice. They intend to make 12 tricks. And this probably means a spade void somewhere. So, spade is a passive lead in this hand. Should we lead passively? Against a slam bid in hopes of making 12 tricks, that is usually not the right answer. I would rather try to establish some side trick in partner's hand (after all, he doubled 6 Hearts -- no doubt because he expects to beat it). So far, so good. What should we lead, then? I would lead a diamond (which has a tiny bit of greater safety if this reading of the hand is completely wrong -- the club holding is more likely to blow up a trick if I lead from it), and I would be wrong, since the full hand is: 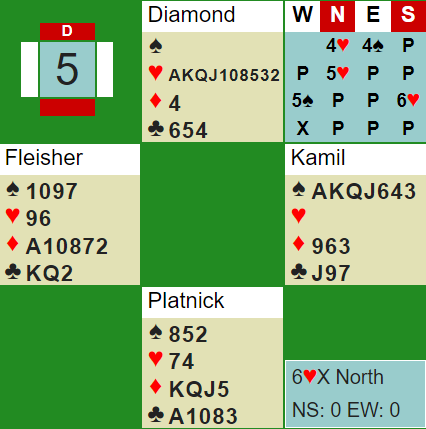 Obviously, only the club lead can defeat the contract. But the main lesson is not how to find the killing lead all the time (can't help you there, sorry). It is rather to ask the right questions as opening leader, to figure out that there may be some urgency in establishing tricks, and that therefore the safe spade lead should be discarded, and you must pick a minor suit to lead from.
(Even though the main lesson of this specific hand is that it is better to bid one more on freak hands. E-W should be sacrificing in 6 Spades doubled, as happened in the other table).
0 Comments
Leave a Reply. |
Archives
September 2021
Categories
All
|
 RSS Feed